
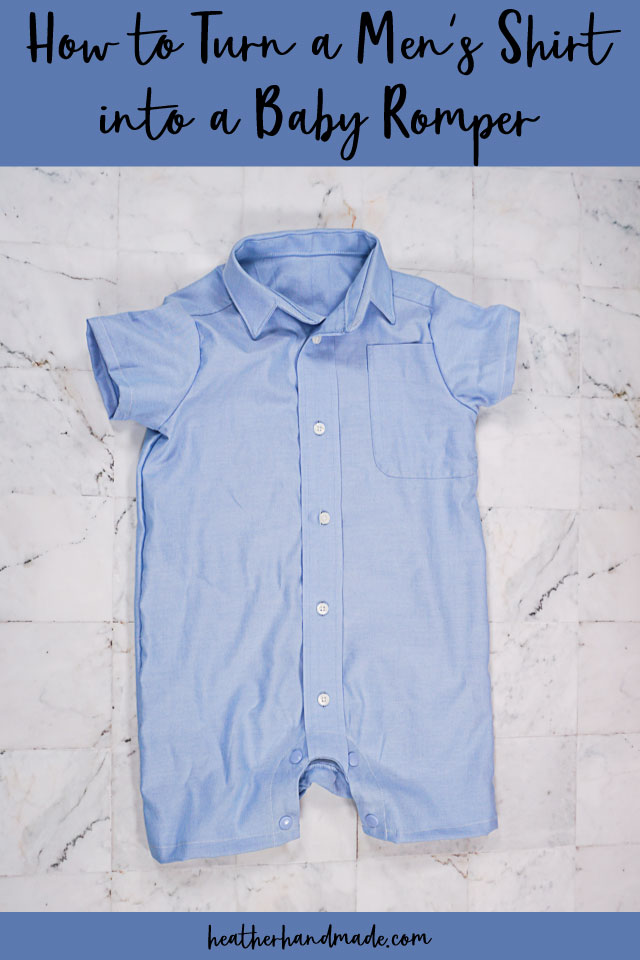
Turn a Men’s Shirt into a Baby Romper with a Free Sewing Pattern

This post may contain affiliate links.
Learn how to upcycle a men’s shirt into a baby romper with this free 6 mos sewing pattern. This intermediate sewing project is so cute for babies to wear!
I have really, really loved making boy clothing. Everytime I make something new or am inspired by something, I am grateful I have a boy and get to experiment with his clothing.
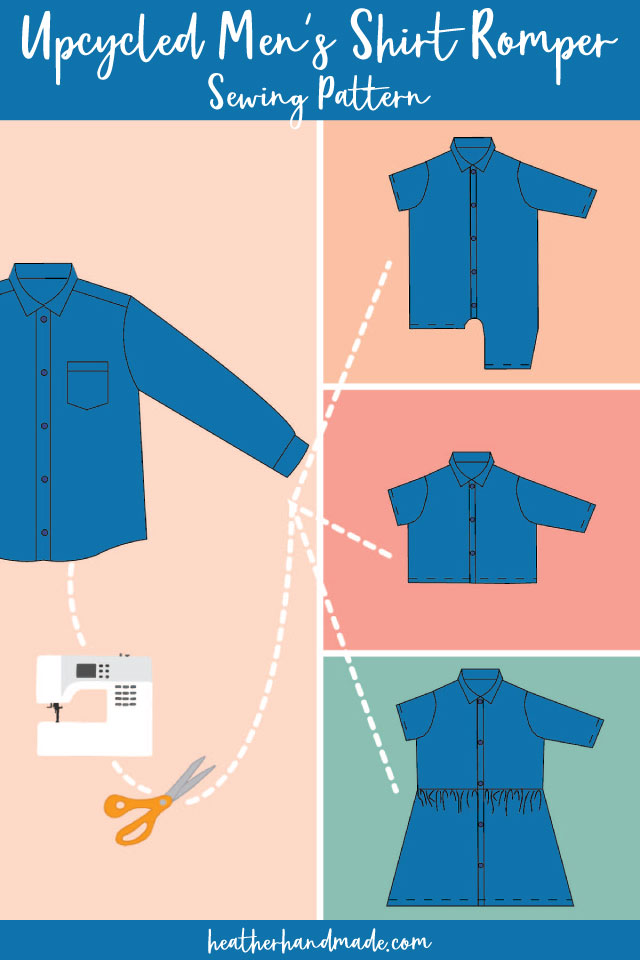
Well, I was first inspired by this shirt romper. I thought I would make it from scratch, but I knew I could easily make something similar by using parts of a man’s button up shirt. Today I have a pattern and tutorial to share!
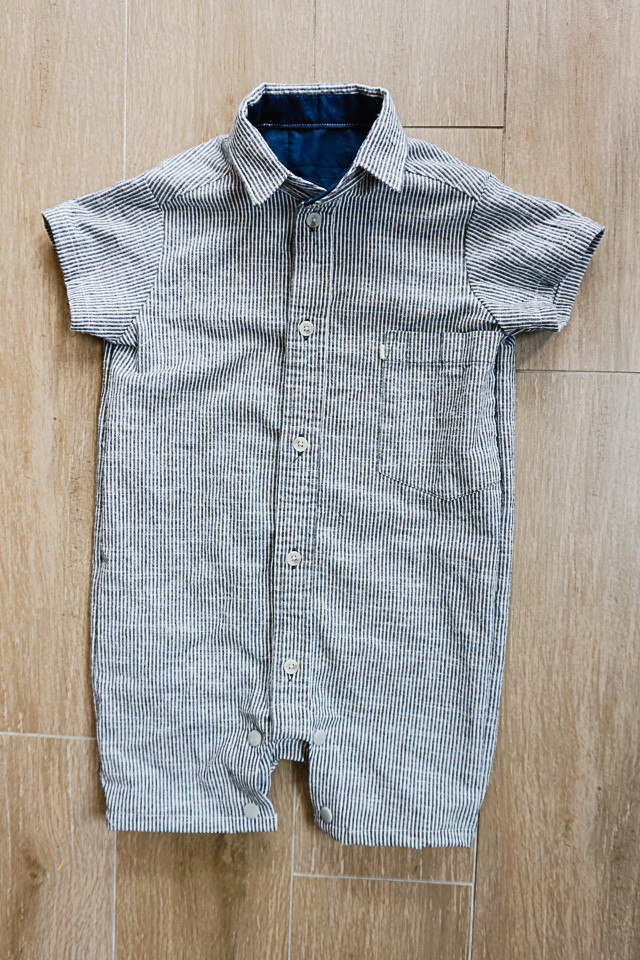
If you use a lightweight shirt, it’s perfect for the hot summer months, and the front buttons or snaps are functional because you use the original shirt front button placket.
Button up shirts are one of my favorite things to refashion. There’s so much fabric, and so many possibilities! Look at all these button up shirt refashion tutorials!
Do you want the paatern in multiple sizes? Get the Upcycled Men’s Shirt Romper, Dress, and Shirt Sewing Pattern
What is a PDF sewing pattern?
A PDF pattern is a sewing pattern designed on the computer and organized so that it can be printed on several letter or A4 size pieces of paper.
I love using PDF sewing patterns because if the pattern gets ruined or if my children or I changed sizes, I can always print it again. It’ll never be destroyed since I have a digital version!
How do you use a PDF sewing pattern?
Open the PDF on a computer and click print. When printing make sure that the scaling is set to 100% or no scaling so that the pattern prints at the correct size.
Once the pattern is printed it can be taped together to get the full size. Then the pattern can be cut for each pattern piece size or individual sizes can be traced so that the pattern can be used again and again. Learn how to use PDF sewing patterns.
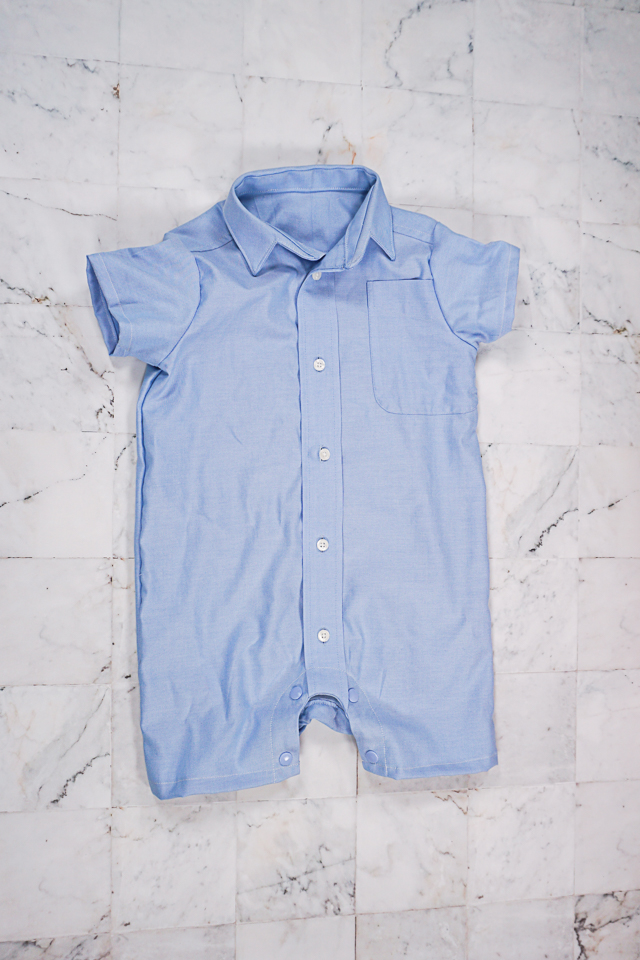
Men’s Shirt Baby Romper Free Pattern and Tutorial
Supplies
- Men’s button up shirt
- interfacing
- snaps or buttons or other closure
- sewing tools
- sewing machine
- Men’s Shirt Romper Sewing Pattern in size 6 mos – get it at the end of the post
Do you just want the pattern and tutorial as a PDF? Get the pattern and tutorial for just $5. You won’t need to access the internet every time you want to make it. Or get the Pattern Bundle with ALL the PDF tutorials!
Cutting
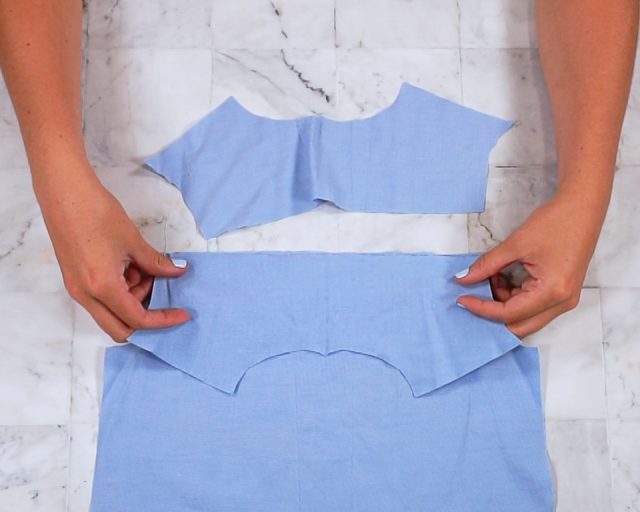
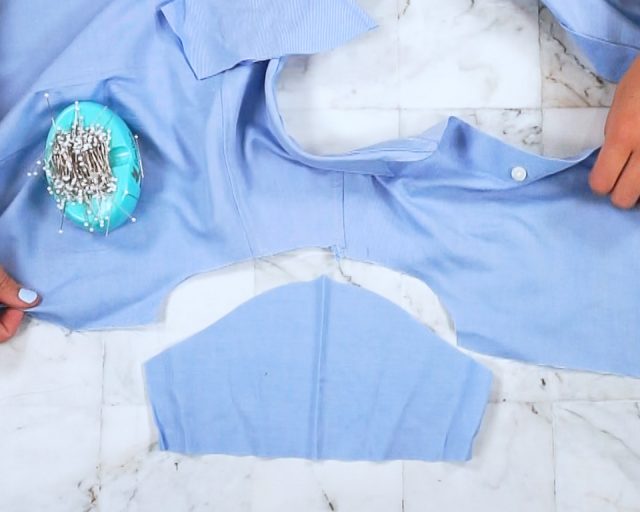
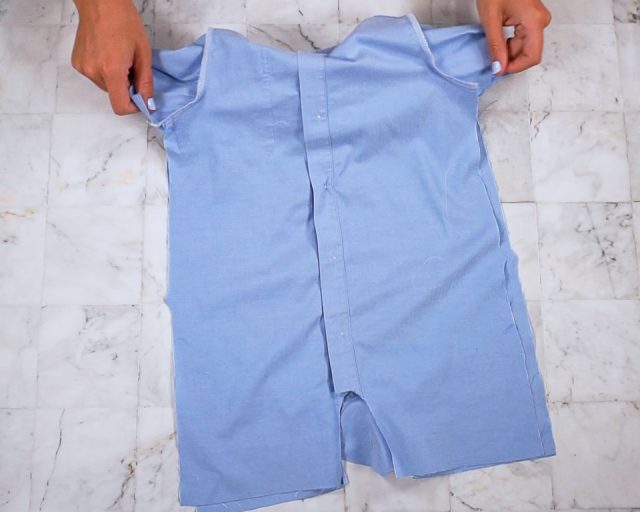
Unbutton the front of the men’s shirt. Line up the plackets and smooth out the rest of the shirt as you can. Cut out the mirrored front body pattern pieces from the front of the shirt. Line up the center front line of the body piece with the line of buttons and buttonholes. Use the button guides so that you don’t cut through a button or buttonhole. There’s a chance that you will be cutting through the pocket especially with the smaller sizes.
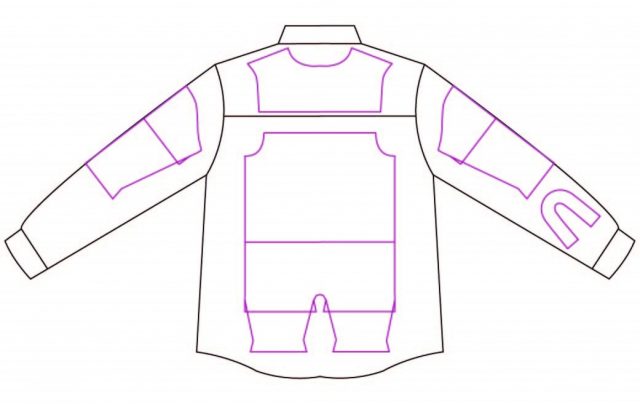
Fold the back of the shirt in half along the center back. Lay the back body pattern pieces below the yoke along the fold and cut them out.
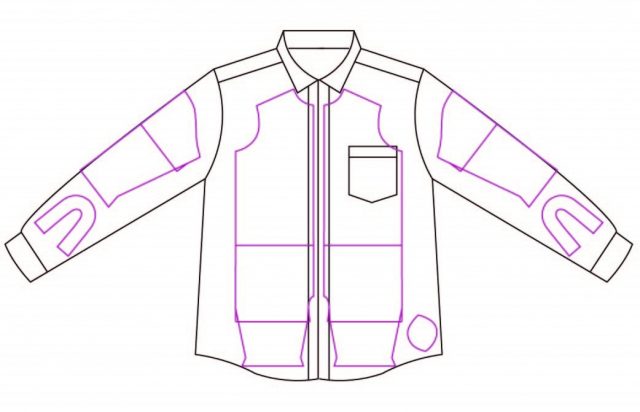
Lay out the yoke pattern piece along the center back fold of the original yoke and cut out two pieces. When you cut from the back yoke you will automatically cut two yokes at one time.
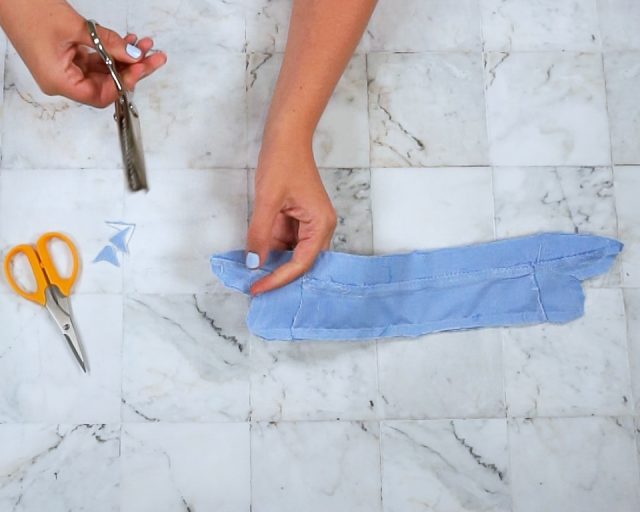
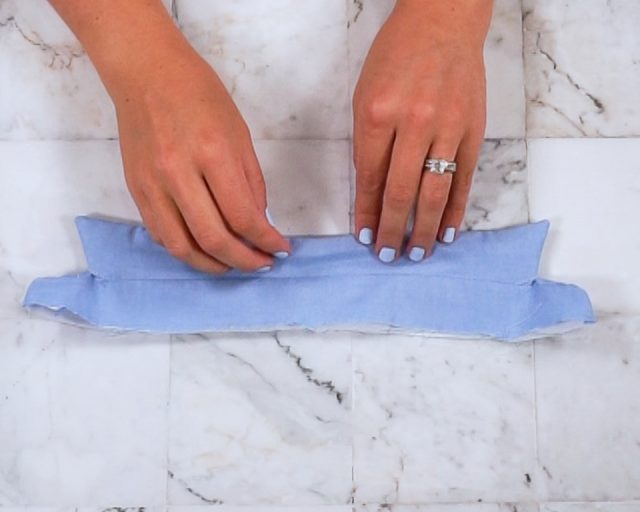
Fold the sleeves along the top sleeve fold line and place the sleeve pattern pieces along the fold. Cut out one sleeve from each sleeve.
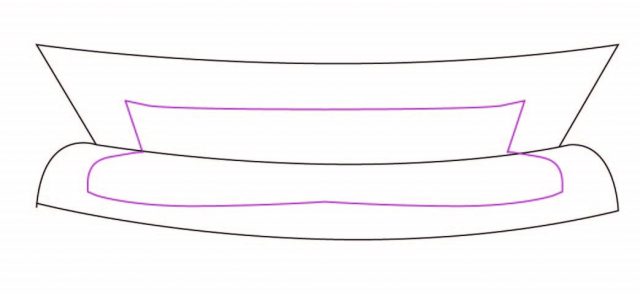
Open the collar and stand up to lay down flat. Place the collar pattern piece on top. Try lining up the seam of the collar and stand with the indent of the collar pattern piece. Cut out two collar pieces. Leave the interfacing attached. When you cut from the collar you will automatically cut two collars at one time. If the collar is too small for the pattern piece, then cut two collar pieces from any fabric left from the shirt.
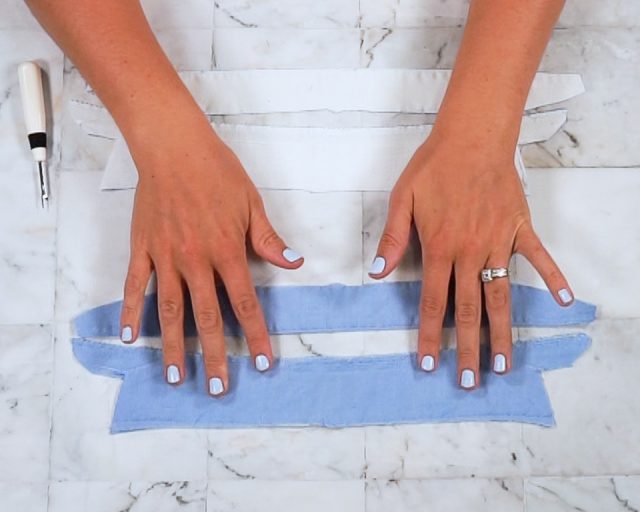
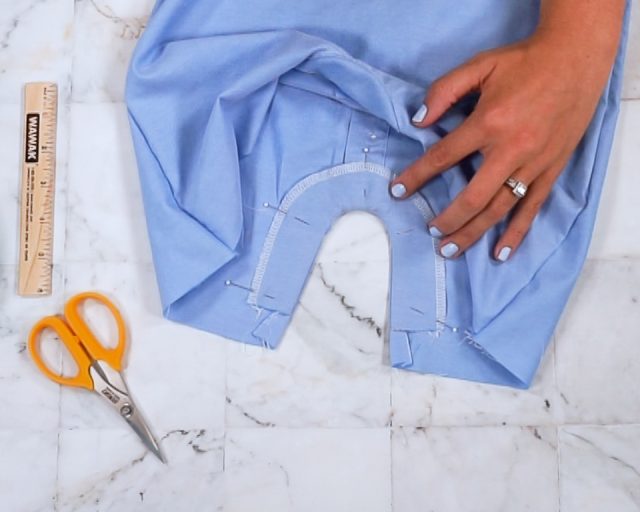
Cut out the inseam facing pattern pieces from whatever fabric is leftover. If you don’t have enough, you can use some lightweight cotton fabric (like quilting cotton) in a coordinating color.
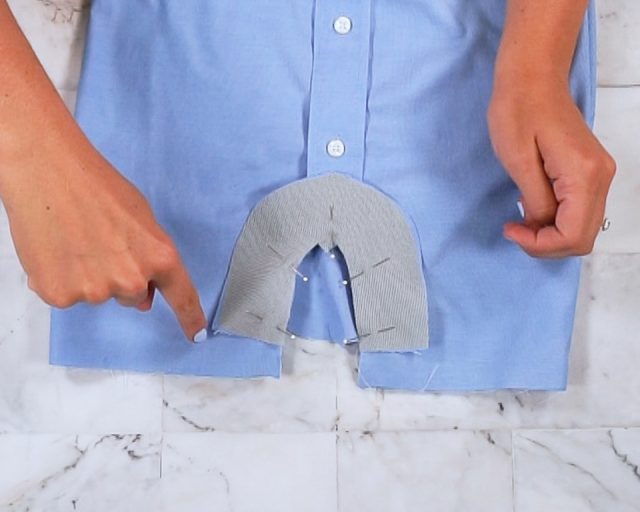
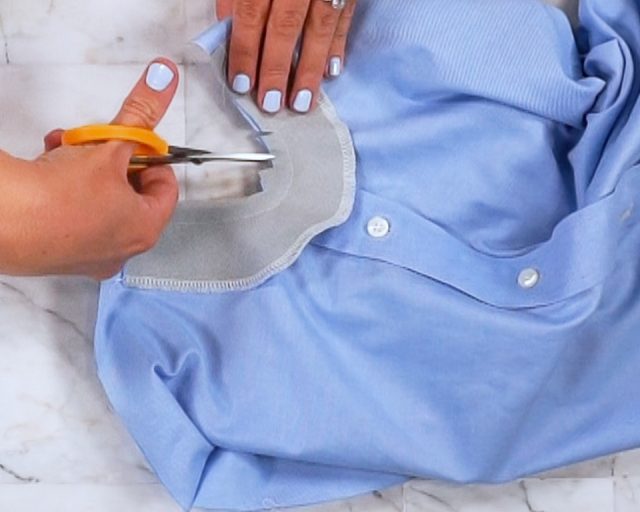
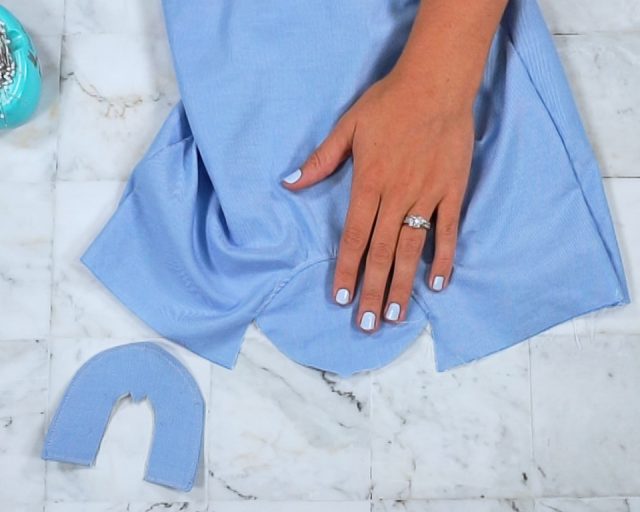
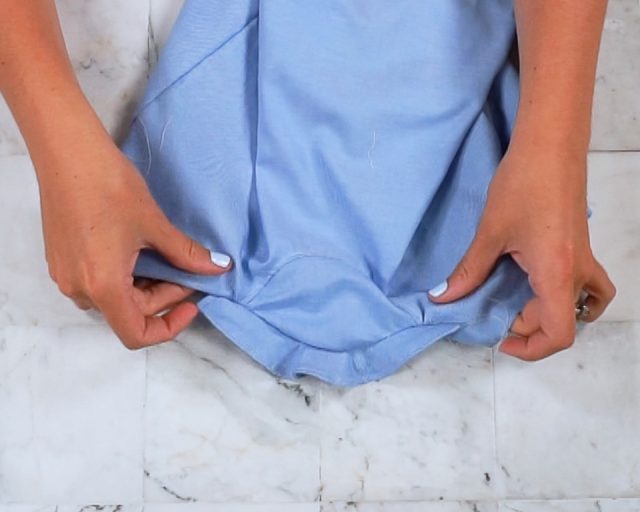
Cut the gusset from a scrap of the shirt. Match up the grainline of the shirt with the grainline of the pattern.
Sewing
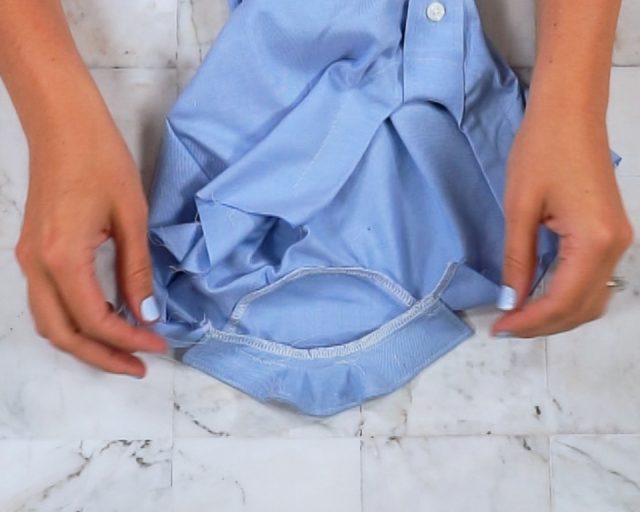
Match up one center back notch of the back body pattern pieces and one notch of the gusset with right sides together. Match up the two sides. Sew the seam and finish the raw edges.
Edgestitch the seam allowance towards the body.

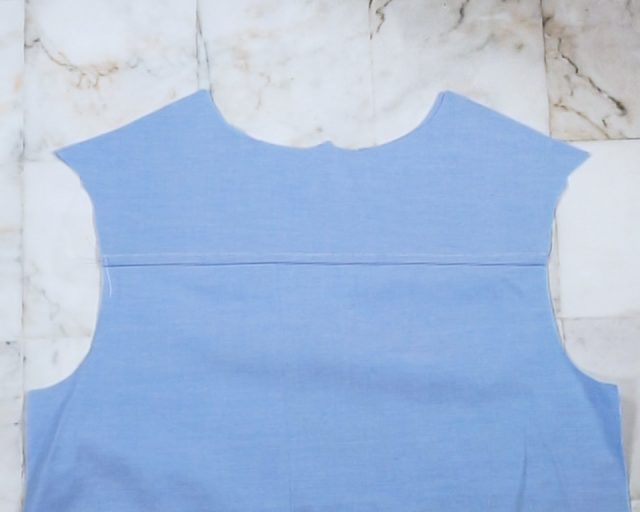
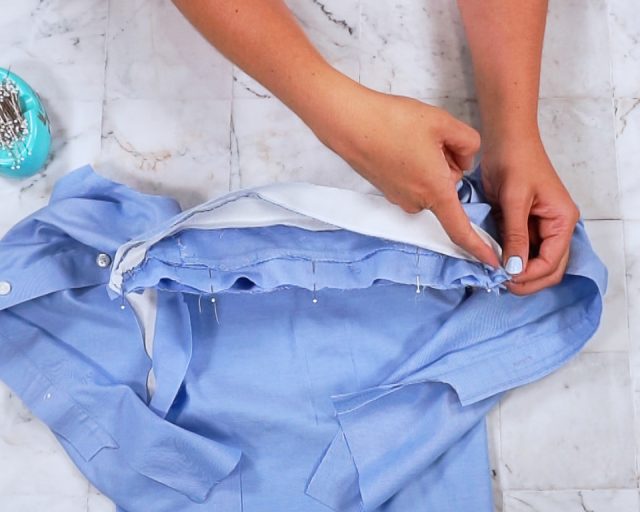
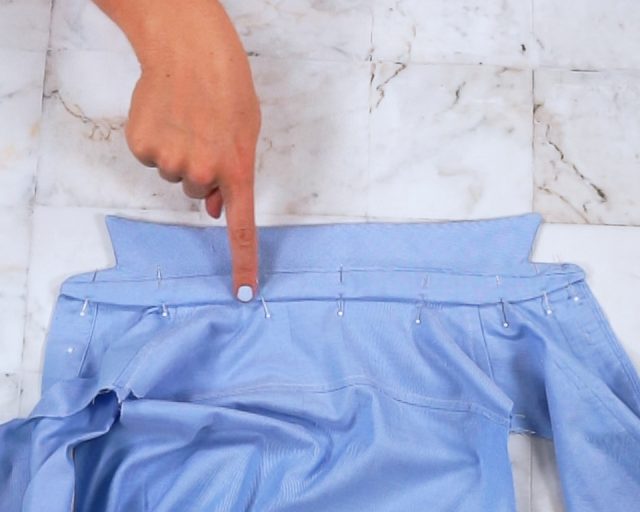
Place one yoke right side up with the straight side on the top. Place the back body on top right side up with the straight side between the arms on the top. Place the remaining yoke right side down with the straight side on the top.
Pin the three layers together in this order.
Sew the three layers together.
Press the two yokes and the seam allowance up and away from the body.
Topstitch on the yoke 1/4 inch away from the seam to secure the yokes up and away from the body.
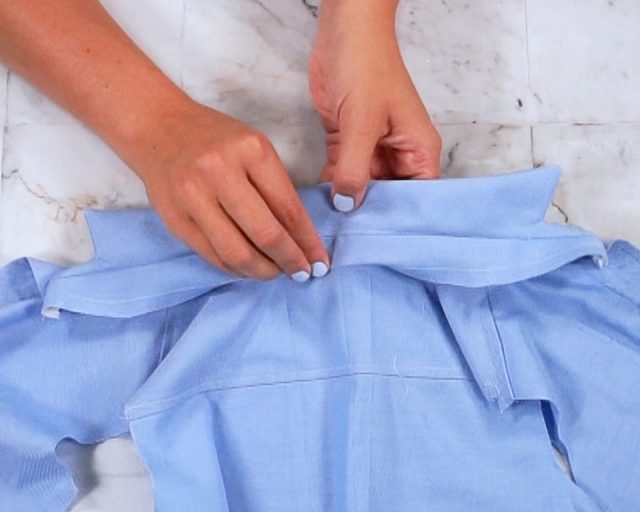
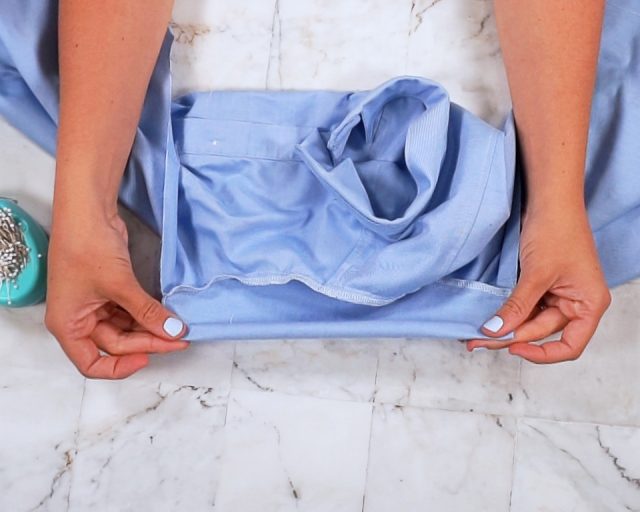
Place the two front body pieces right side down onto the right side of the back. Fold the back yoke down and away from the shoulders.
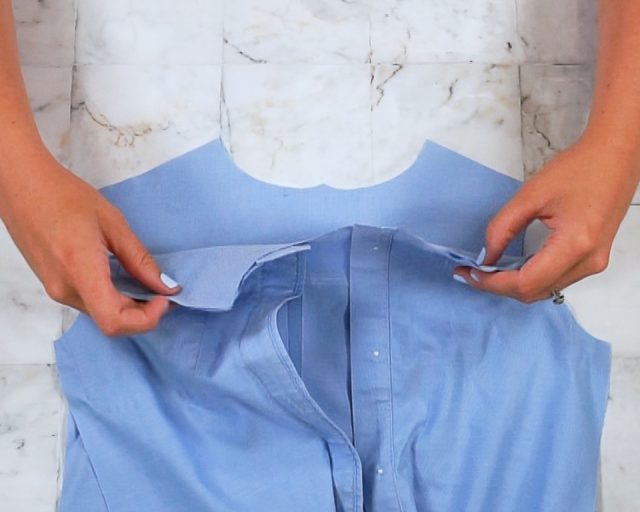
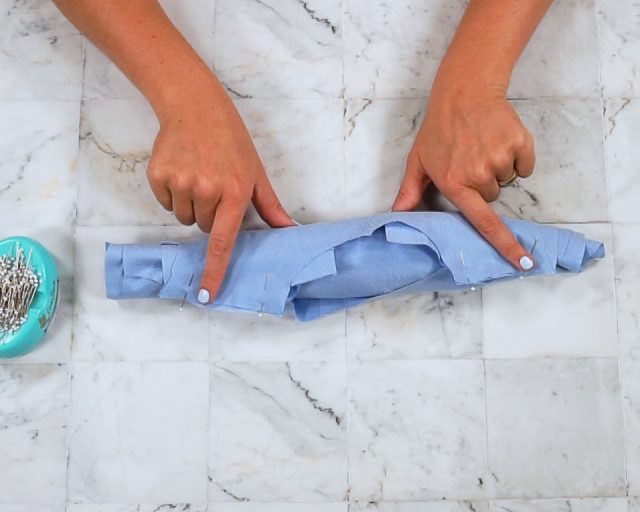
Roll up the body front and the body back pieces into a tiny roll until you can sew both yokes. Bring the lower yoke from the bottom and up over the roll until all the shoulder seams are matching.
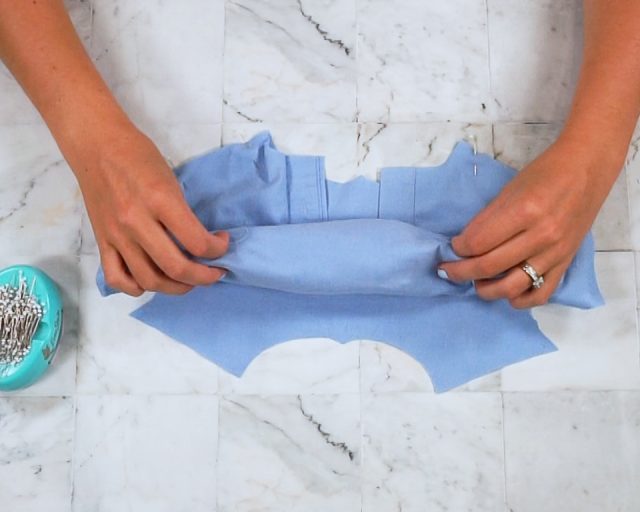
Line up the front shoulder seams with the remaining yoke shoulder seams.
Sew the three layers of the shoulder seams together.
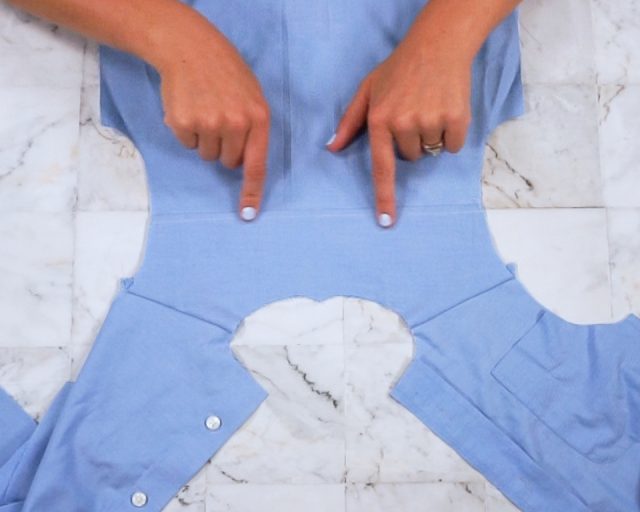
Pull the body roll out of the yokes through the neck hole.
Press the yoke and the seam allowance away from the body. Topstitch the shoulder seams on the yoke 1/4 inch away to secure the yokes up and away from the body.
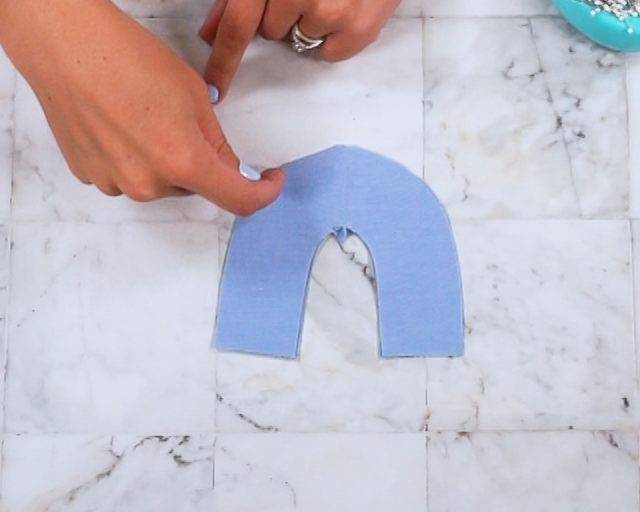
Use a seam ripper to unpick the seam that runs through the collars. Press all the collar pieces flat.

Resew the collars onto the stands but keep them separate so the you have two collar pieces.
Leave the interfacing on the collar pieces.
If the collar pieces are not interfaced then add interfacing to one side.
Place the collar pieces right sides together matching all the edges.
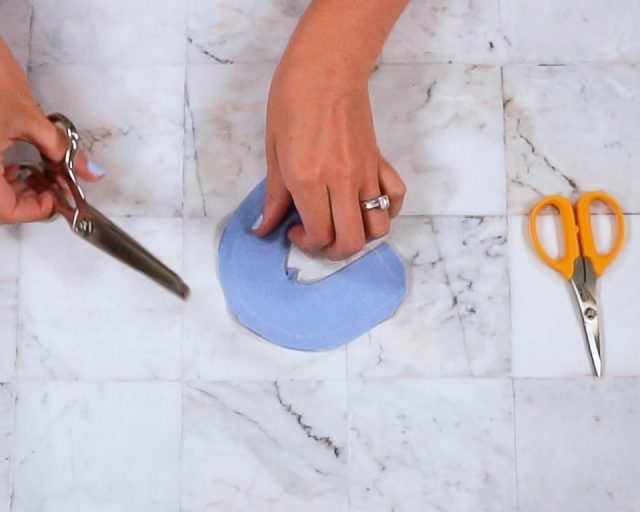
Sew from the curved front up and around the collar points, and then back down to the other curved front. Leave the neckline edge open.
Trim the points and notch the front corners to reduce bulk. Clip the inner point.
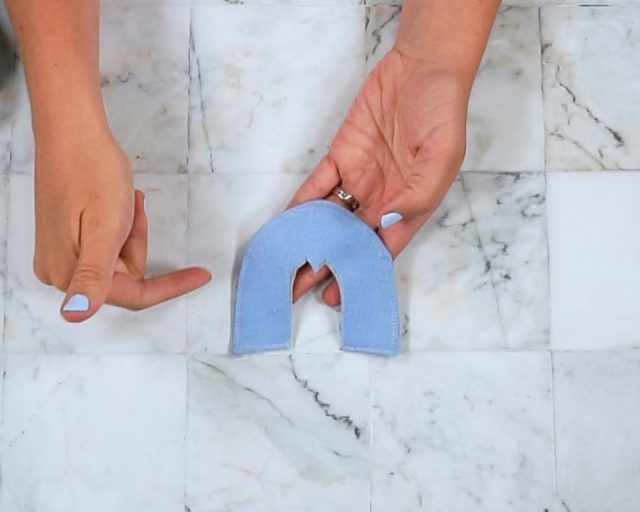
Turn the collar right side and poke out the corners. Press the collar flat.
Sew a line on the interfaced side of the collar 3/8 inch from the edge along the neckline.
Place the right side of the uninterfaced side of the collar to the right side of the neck. Match up the front and the center back.
Sew the pieces together but do not sew through the collar seam on each side.
Press the seam allowance and collar up away from the body.
Fold the edge with the 3/8 inch stitching guide under and pin to the neckline so that all of the collar is enclosed.
Edgestitch along the neckline and around the collar to keep the edges nice and to close the hole.
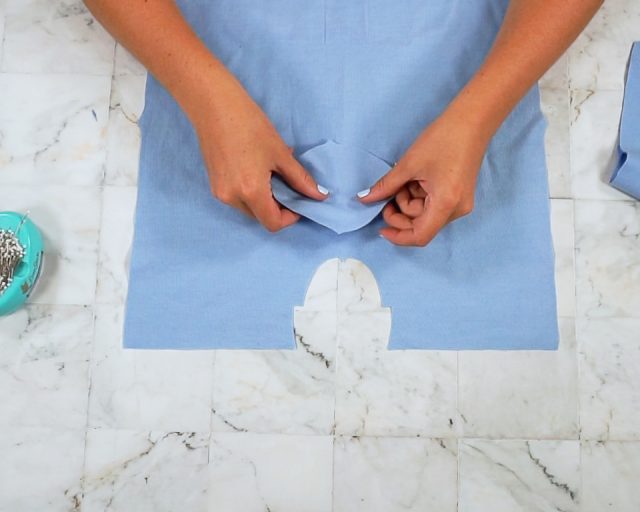
Interface the front inseam facing. Finish the outer curve. Interface one of the back inseam facings.
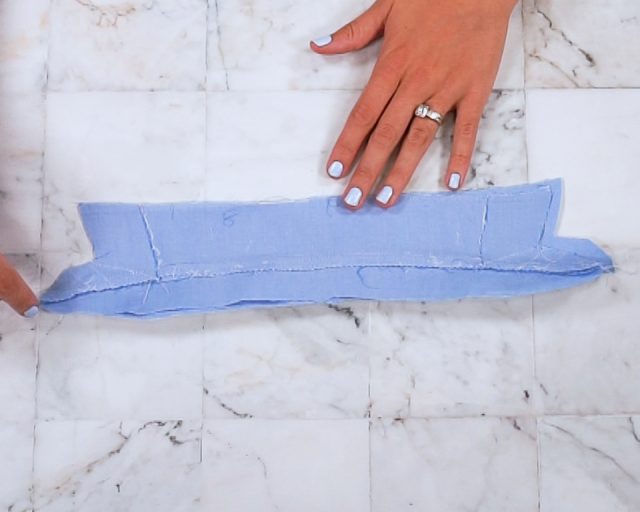
Place the back inseam facings right sides together. Sew the bottom straight edges and the outer curve.
Notch the outer curved piece. Trim the outer two corners.
Turn the back inseam facing right side out and poke out the corners and curves. Press flat.
Edgestitch around the finished seam.
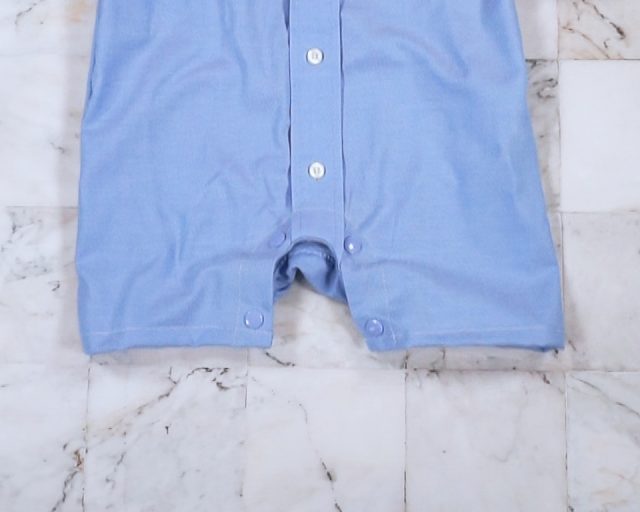
Place the bottom of the button plackets on top of each other and tack closed with a little straight stitch.
Place the front facing on the front body piece. Line up the bottom edges with the top of the hem and the center front with the center of the placket.
Sew around the inner curve.
Clip the inner curve.
Flip the facing to the inside of the front body and press in place. Sew the facing in place 1 inch away from the inner curve.
Place the back inseam facing on the inside curve of the back inseam. Match up the center marks and the bottom of the facing with the top of the hem.
Sew the seam carefully since the shape of the curves change. Finish the edges.
Press the seam allowance towards the body and away from the facing.
Edgestitch the seam allowance towards the body and away from the facing.
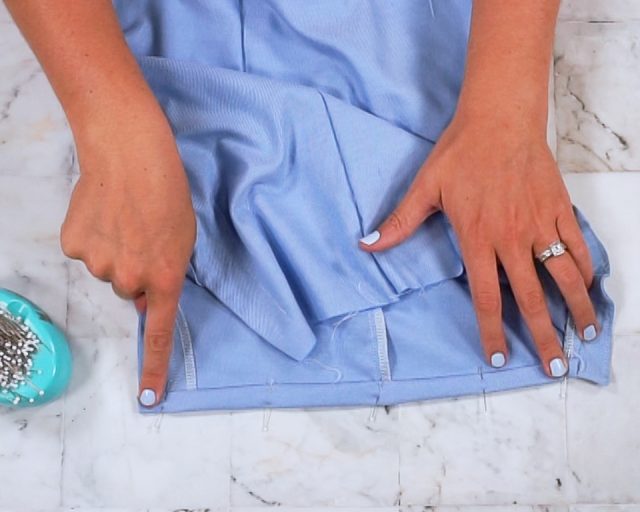
Add 4-8 snaps depending on the size you make to the front inseam and back inseam facing. A guide for the top and bottom snaps was given on the pattern pieces. Fill in a snap in between if needed.
Get detailed information about installing snaps.
Place the sleeves in the armscye with right sides together matching edges and notches.
Sew the seams and finish the raw edges.
Press the seam away from the body.
Fold the sleeve hem up towards the wrong side of the sleeve 1/2 inch and then another 1/2 inch. Sew 3/8 inch from the bottom edge. Press in place.
Line the side seams and sleeve seams right sides together. Match up the armscye seams. Sew the seam and finish the edges.
Press the seam allowances towards the back.
Tack the sleeve seam allowance towards the back of the sleeve.
Fold the hem up 1/2 inch and then another 1/2 inch. The edges of the facing should be tucked inside the hem. Sew 3/8 inch from the bottom edge. Press in place. You finished the romper!
Get the Free Sewing Pattern here!
If you make something using this pattern, I’d love to see! Please share it on social media with the hashtag #heatherhandmade and tag me!

I believe small sewing moments can create great joy. Find your own “right” way to sew. -Heather
where do I find the Mens shirt baby romper pattern to download?
https://www.heatherhandmade.com/product/button-down-shirt-romper-pattern/
can’t download and I have subscribed and entered the password a few times
what am i doing wrong?
Will I be able to get the pattern from the newsletter? I have the tutorial printed.Thanks so much. .Our family is excited about being able to use shirts from loved ones for our little one.
You get the pattern in the subscriber library and the password for the subscriber library is in the newsletter. I send a newsletter once a week and the password is in each one!
Ugh! I have entered the subscription info several times and never get the link. Very frustrating…
Can you let me know your email? I’ll make sure you are on the list and get a welcome email!
Thanks for sharing, this is so great! Do you happen to have larger versions of the pictures? They don't get bigger when I click them and I'm struggling a bit on the yoke/collar piece.
Hi! Thank you so much for such a great tutorial and pattern. Is there any way to size it up for a size 3T? What if I didn't actually use a Men's shirt and used fabric instead so that size of the original shirt wouldn't be a problem?
-Hallie
You would just need to add width and height to all the body pieces. You would be fine using regular fabric as long as you added hem allowance and button placket allowance on the front.
Heather, I apologize for my previous comment. It seems my printing issue may have been browser related. I tried it in chrome and IE and adjusted some of the page set-up settings. I was able to print something that looks more correct, so I'll try it and hope the end result isn't doll-sized. I'm really excited for this as I have SO many old dress shirts I don't know what to do with. Thanks again.
This is exactly what I was looking for! When I click on the pattern link, it opens in another webpage tab. When I tried to print at no scale so it wouldn't shrink the images, it cut off some of the pattern pieces and didn't seem to print correctly. Any suggestions as to how to print? I typically use firefox, but I also have chrome or Internet Explorer I could use. Also, do you have any pattern measurement reference so I can be sure it printed correctly? I'd love to try this!
I would love to print and use the pattern. However, when I click on the link, it opens in a webpage and doesn't seem to print the entire pattern pieces. I selected no scale so it wouldn't shrink the pieces. Any suggestions? Also, do you have a scale reference so I can make sure it prints the correct size? Thanks!
When I print the pattern, I can't make sense of how Body Back A and Body Back B line up…they are different sizes and the sides don't match up no matter which way I turn them. Can you post a photo of what the back pattern pieces should look like when joined?
The center back of Back A and the center back of Back B should line up. Body B should be rotated one turn to the left. If you look at the picture for step #1 you can see how the back is straight and then curves way out to the right.
Does that help?
I tried doing what you said, but even if you rotate Body B, there are no 2 sides of the same length. Something is off.
Did you line up the center backs?
soo cute! I'll have to wait til my nephew gets a little bigger!
any chance you have larger sizes to share? 😀 i just went to make one for my son but didn't notice the size until i had printed it off. he's in 12 or 18 mos clothes and i only have one shirt to try it with so i don't want to mess it up by trying to make it bigger and making something really wonky!
This is so cute – and practical. I can't wait to try it. And, your little man model is also so happy and delightful too. =) Cute overload =)
Cute! I will feature this on 9-8-12 for my readers!
seemesew.blogspot.com
I saw this on Refashion Co-op, and it is amazing! I love it!
This is so great! I saw it on Refashion Co-op! Thanks for sharing this!
Great tutorial! I have to make one of these for my little man, he's in desperate need of some cute outfits.